kw: photography, techniques, software
Photography, like realistic painting, is the art of getting onto paper some facsimile of what the eye sees. Until you try to get "all" aspects of a scene to match what you could see, it is hard to realize just how powerful human vision can be. While our vision system is only in sharp focus over a rather small area—a few degrees wide—we rapidly scan that focus over a scene and our memory stitches it together into a comprehensive view. Reproducing a single still image with that comprehensive view is a challenge. In the discussion below, I'll mention software that increases the areal extent of a digitally imaged scene (panorama stitchers), that increases the apparent dynamic range (HDR programs), and that allows the display of extreme depth of field (focal stitchers).
Firstly, we can swivel our focus over ±70° right and left and ±50° up and down,
without moving our head, and we routinely scan an angular field that covers about a tenth of the maximum area, perhaps a thousand or so square degrees. Average resolution in the visual center is about 1/60 degree, so 60x60 is 3,600 pixels per square degree. That doesn't seem like too much: about 3.6 Megapixels (Mpx). A photo that covers a 39°x26° span with 60 pixels per degree just matches what we "usually see", discounting peripheral vision.
A quick swivel of the head, though, allows us to gather a much wider span, and we tend to remember the whole panorama as a unit. The more we gaze, the more we see, and we frequently remember a "sight" that covered 150°x60°, containing 30 Mpx or more.
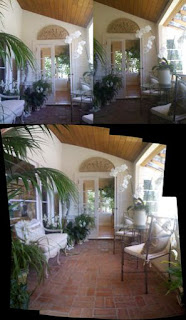
For generations, photographers have used scissors-and-paste methods or darkroom techniques to put together panoramas that covered all of a scene. These days, software can do this for us. I remember the awe I felt when first I stitched a scene together. I used the "Make Panoramic Photo" option in Windows Live Photo Gallery (there is a link to download it
here).
There is also a Photo Stitcher program that comes with any Canon camera, and there is an app for an Iphone, which was used to make the montage shown here. (All the images in this post are shown rather small; click on any of them to see a larger version). This montage shows, at the top, two of at least four images used to make the raw stitch shown at the bottom. One would normally crop out a rectangle to your taste from the rather blobby stitched image.
The Canon software has some hand controls available, and requires hand work if your collection of images don't follow a single "straight line". I've used the Windows Live tool to stitch as many as nine photos in a 3x3 matrix, and as many as ten that were in a line, which it did without further input from me beyond choosing the images I wanted stitched. You just need plenty of overlap, 20% or so in each direction.
You can also get large panoramas from a costly fisheye lens on a high-dollar camera with 20+ Mpx camera such as the Nikon D3X. Stitching is cheaper. So this helps us catch a scene as big as the eye can see.
Then, there's the dynamic range conundrum. Film photography helped us out by recording dynamic ranges of up to 1000:1 in a good negative, and we could use print paper with various amounts of contrast to reduce any or all of this range to the 50:1 range that can be reproduced on a good print. 1000:1 is ten f-stops (actually, 10 stops is 1024:1). But the eye can see, in any glance, a range of more than 15,000:1, perhaps fourteen stops. And when we look for a moment into a brighter or darker part of the scene, the eye quickly adjusts over another five or six stops (~50:1) to allow us to see details nearly everywhere.

In this image, the eye sees at least as much as is shown in the left panel, while a "normally exposed" single digital image is stuck with that on the right, which has a dynamic range of no more than 256:1; and actually, since digital is a linear medium, some of the range is wasted, and we don't see all 256 shades, but more like about 80-100. For many scenes that is OK, but of course we often want more.
Software such as EasyHDR Basic (available free
here), takes information from three or more images that were exposed at different levels, to produce one range-reduced image that looks more like what the eye could see. The common technique is to use the Bracketing method that many cameras now have in them, which exposes three times, once "normal", once two stops faster, and once two stops slower. Some cameras even will combine these in to an HDR image automatically.
Adding a total of four stops more brightness information to your scene takes a 256:1 range and expands it to 1024:1, if you are getting JPG files from your camera. If you have the ability to get RAW format files, they start with either 4,096:1 (12 bit) or 16,384:1 (16 bit), so it is better when shooting RAW (which EasyHDR can handle), to go manual and shoot at least four stops over and under for your added images in the stack you'll be using. Of course, be sure to do this using a tripod. Though the software can shift the images to overlap better, the result will lack some sharpness if you start with handheld images. I understand that
qtpfsgui has better control of image offsets. Haven't tried it.
So what do we have at this point? Panorama software that can make our pictures taller and wider as needed, and HDR software that can increase the detail we see in the highlights and shadows. There is one more step (so far…).

When your eyes scan a scene, they automatically focus, so your memory of the scene is sharp everywhere, with rare exceptions. A camera's depth of field depends on two things: focal length and aperture (f/ratio). Wide-angle lenses are most forgiving; at a specific f/ratio (say, f/8), a lens of half the focal length will have twice the depth of field at mid-range, and more than that near the hyperfocal point (which is the focal distance to set so that things at "infinity" are just in focus, and a range of closer objects are also seen sharply).
There are trade-offs, however. In small cameras, such as most point-and-shoot, the pixels are so small and the lens is so small, that while there is a large focal depth, the image is slightly unsharp everywhere. When you print a 10 Mpx file on 6x4 paper, it looks good, but enlarging it past 7x5 can show up some fuzziness. In SLRs, with their much larger sensors, the lenses are also larger, and their focal lengths much longer. For example, my Nikon D40's lens has a focal range of 18-55mm; my Canon SD1200's lens has a focal range of 6.3-18.9mm.
So far so good. Because its lens is so short, the Canon's range of f/ratio is f/3.5 to f/8, and no further. The Nikon's is f/3.5 to f/32. One might think, "Great, the Nikon can take really deep-focal-range pix", and it can, but with it there is an overall fuzziness due to diffraction. Roughly speaking, the smallest spot a camera can record (in the sensor plane) is the wavelength of light used times the f/ratio; for f/32, this is 32x0.5µ, or 16µ. The sensor's pixels are 7mm apart, so a 6 Mpx image taken at f/32 has no more resolution than a "perfect" image of 1.5 Mpx, or even less. A ratio of f/11 is about as far as one can go for an image that is sharp at least
somewhere!
Helicon Focus to the rescue. This software (available
here) takes several images shot at different focus distances and combines the sharpest parts of each into a single image with "infinite", or at least, "extreme", depth of field. The promo photos showing the fly's head and the shotgun illustrate what is possible. It takes three to ten or more images to produce one XFD (I just made this up, for eXtreme Focal Depth) image.
Now, the eye does all this at once. What are we to do?

One reviewer noted that one piece of HDR software (he didn't say which) can also make panoramas. Presumably, you take two or more sets of your panorama images and the program both stitches and applies HDR composition to get an image like this one.
This is cool. It also takes lots and lots of images. This image alone used at least three angle settings to cover the width of the view, and at least three images of each angle setting, for nine starting images. I assume this was made at a setting similar to f/11, so there is decent focal depth.
To get real XFD in such an image, you're getting into a combinatorial explosion! At the very least, 27 images to start with, assuming you had a program that could do all three things at once!! The original image for this HDR panorama is about 2500x800 pixels, or just 2 Mpx. But it took at the very least nine 1.5 Mpx images as a starting point, and I'll bet that the original camera has 6 Mpx or better (54 Mpx or more for the progams to grind through).
To recap: A well-framed and -exposed photo with almost any modern digital camera can record most of what the eye sees over an angular area that one tends to take in "at a glance". To take in all that the eye
can see over the area of a quick side-to-side scan requires lots of images. At the very least, 2x2x2, or eight, and a more likely "usual" stack of 3x3x3, or 27. There is plenty of room for improvements in photographic techniques and in the software needed to support them.
One way to sidestep the XFD situation is to use a Gigapixel method (there are several, most using robotic image capture), in which a very large image is stitched from a multitude of small images. Each can be well focused in its small area, so the result will appear to have extreme focal range. Since the Canon software can stitch together as many as 26 images (and I think the Windows Live tool is similarly capable), careful panorama planning can produce large photos that are sharp nearly everywhere. But just think, if you want to go HDR with 26 starting "pointings"; it'll take at least 78. I think the right order of processing is to make the three panoramas, then do HDR processing. The other way around, you'd likely have variations of final lightness. The mind boggles.


 Posts
Posts

